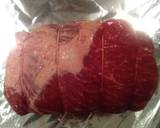
Always tender roast beef!!!
Introduce
Chef :
INSANExBUTCHERAlways tender roast beef!!!
Now for this roast and cooking process you will not want to buy anything expensive. No rib or loin roasts here just a nice inexpensive piece of bottom/top or eye of round roast or bought all together a true rump roast still connected . The broccoli dish was the side and that's the first couple slices of the beef!!!
Ingredient
Food ration :
4-5 servingsCooking time :
debatableCooking instructions
* Step 1
Alright now the salt. Your goal is to completely cover every inch of your roast with salt not super heavy but not lightly either.

* Step 2
Wrap roast in plastic wrap and refrigerate 12-24 hours. The salt will start the tenderizing process. On a roast ranging from 3 to 8 lbs. The cut off point is usually 24 hours.

* Step 3
Take out your roast from your refrigerator and Pat dry entire roast with paper towels."Do not Rinse". Pepper roast on all sides.

* Step 4
In a preheated skillet med/ high heat add your peanut oil and sear meat on all sides. Most likely you'll have to use tongs and hold the roast to achieve this on the ends and some other areas of your roast.

* Step 5
Now add your butter garlic and thyme to the side of your skillet. Be wary the thyme will Pop in the oil and butter. Mix your fresh herbs and garlic in the butter and bast the roast with a spoon. Take your tongs and roll the entire roast all over in the mixture.

* Step 6
Now I put the roast on a non-preheated pan fat side up but you can still use the skillet you just seared in. I find if you use the skillet the underbelly of your roast tends to burn. Plus make sure your skillet is oven proof. Then put your thyme and garlic on top with a few spoonfuls of the oil butter mixture to coat.

* Step 7
If and you do not have a leave in oven thermometer you should get one. Insert thermometer into the center of your roast. Cheap ones online have worked for me. I have over 40 cooks with this 20 dollar one so far compared to the Cadillac I owned and died in 20 cooks so not too bad for cheaper ones!!!

* Step 8
Place your roast in a preheated oven at 250 degrees. I know sounds too low but remember where not cooking rib or loin roasts hear today.We need to break down the connective tissue. Set your thermometer to 135 degrees. In a brisket being smoked it's more like in the 180's to break down with a rest time.

* Step 9
Getting close. If you do not have a leave thermometer in it's about an hour to an hour and a half. Make sure to check with a regular thermometer after one hour.

* Step 10
Remove thyme and garlic.

* Step 11
Loosely cover with tin foil and let rest for 10mins. During this rest period the roast will gradually raise in temp of 8-10 degrees making it a perfect med rare.

* Step 12
If there is someone in the family that likes it more well done give them the outer slices!!! Always slice against the grain of any meat your cutting after being cooked. Also if your butcher knows anything and is not a glorified deli clerk witch most are these days.the way they tie it will be the general correct direction to begin slicing. Cut a few and taste for tenderness correct your angle as needed. Oh'yea the thinner the slice the better!

* Step 13
Hope you all enjoy!!! Cheers

Note: if there is a photo you can click to enlarge it
Tag
Share
10 Pieces Of Expert Nutrition Advice
1. Start Small
2. Fill Your Plate With Beans and Leafy Greens
3. Focus on Adding—Not Subtracting
4. Taste the Rainbow
5. Prioritize Potassium
6. Eat More Plants
7. Focus on Your Immune System
8. Try the Mediterranean Diet
9. Understand the Impact of Food
10. Guard Your Gut
See moreCopyright © 2024 Cookcic
