Homemade Cherry Preserves
Introduce
Chef :
FeliceHomemade Cherry Preserves
We got two small buckets full of fresh cherries from my uncle and aunt's neighbors here in Germany. The neighbor suggested making some preserves and so I tried it out the next day. Very nice! I got almost two pint jars (800-900 ml) out of this amount.
Cooking instructions
* Step 1
Stone the cherries (it's about 900 g after stoning). Puree before putting in pot if you want a smoother consistency.

* Step 2
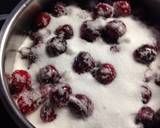
Put in a medium pot along with the sugar and lemon juice. Yes - it's a lot of sugar, but this is what "preserves" the cherries and prevents them from going bad.

* Step 3
Turn on medium high. After a few minutes when the cherries softened up a little, I roughly mashed them up with a masher. You can also use a stick/hand blender to break down the cherries some more.

* Step 4
When the cherries come to a boil, they will foam up. Skim off the foam every several minutes with a spoon - you can put it aside in a little cup and eat it with yogurt or ice cream. It's quite good!

* Step 5
While the cherries are cooking, place a small plate in the freezer so you can test the doneness of the preserves later.
* Step 6
Continue to cook the cherries on medium to medium-high stirring every few minutes to ensure they don't burn. The juice will gradually get thicker, darker and gooier. It took mine around 60 minutes to get to that point.

* Step 7
To test doneness, remove the plate from the freezer and put a little bit of the cherries on it. Place back in the freezer for 2-3 minutes and then take out again. Push the chilled preserves gently with your finger - if it "wrinkles" up, it's done. If not keep cooking. (see photos below)
* Step 8
This isn't done yet because the preserves are still too watery to hold up with pushing your finger through.

* Step 9
It's hard to tell in the photo but, here the cherries are gooey and wrinkle a little bit when pushing your finger through the preserves. You can turn off the heat now!

* Step 10
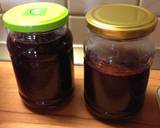
Let cool off for a few minutes, then transfer to a large jar or two smaller ones. Be careful not to put in cold jars or they can crack (optionally put the hot jam in hot jars). Cover and let cool completely. Store in the refrigerator. It should be good for a few months.

* Step 11
Really nice with a creamy cheese on bread or toast!

* Step 12
Some other ideas I've saw on the internet for flavoring: Add a splash of Kirsch liquor in at the end of the cooking. Or a few drops of almond extract (just a little or you'll ruin the taste apparently!), or vanilla bean (maybe cook with the cherries?).
Note: if there is a photo you can click to enlarge it
Share
10 Pieces Of Expert Nutrition Advice
1. Start Small
2. Fill Your Plate With Beans and Leafy Greens
3. Focus on Adding—Not Subtracting
4. Taste the Rainbow
5. Prioritize Potassium
6. Eat More Plants
7. Focus on Your Immune System
8. Try the Mediterranean Diet
9. Understand the Impact of Food
10. Guard Your Gut
See moreSimilar dishes
Copyright © 2024 Cookcic
